The process for setting up a file with bleed and trim marks is the same, regardless of the final size of the printed piece. Here is a revised step-by-step guide for setting up your file with bleed and trim marks for a size smaller than 8.5x11:
Step 1: Create Your Document
Open your design program and create a new document with the dimensions of your final printed piece. For example, if you are designing a postcard that will be 4x6 inches, set your document size to 4x6 inches.
Step 2: Add Bleed
Add bleed to your document by extending the design elements beyond the edge of the page by 3-5mm. For example, if your final printed piece is 4x6 inches, make your design elements 4.25x6.25 inches.
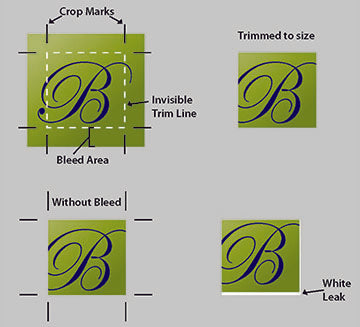
Step 3: Add Trim Marks
Add trim marks to your design by placing vertical and horizontal lines at the corners of your document. The lines should be exactly at the edge of the bleed area, and they should indicate the exact size of the final printed product. Trim marks are usually about 0.125 inches long.
Step 4: Save Your File
Save your file as a high-resolution PDF. Be sure to include the bleed and trim marks in the PDF. When saving your file, choose the "PDF/X-1a" option, which is a standard format for print-ready files.
In conclusion, setting up a file with bleed and trim marks is an important step in the printing process, regardless of the size of the final printed piece. By following the steps outlined above, you can ensure that your printed product looks professional and polished.